How to unlock No Fly Zones in DJI GEO 2.0 - MegaDrone guide.en
2019-06-13

Fly safely with DJI or DJI GEO Technology 2.0
DJI practices Fly Safe policy, which is designed to enhance drone flight safety and make it easier for pilots to use BSPs in accordance with local laws and regulations.In February 2019, DJI updated its Geospatial Environment Online (GEO) 2.0 geofencing system, expanding it to as many as 32 European countries. The system includes a list of so-called No Fly Zones (NFZ) that is, places in the air zone where BSPs are banned from flying - airports, military units, national stadiums, power plants, etc.
The DJI GEO 2.0 update also covered TFR sites-that is, those subject to temporary flight restrictions-due to major events in the area or natural disasters, data on which is obtained from the European Organization for the Safety of Air Navigation. Air Navigation Safety Authority - Eurocontrol.
As DJI informed us during the process of unlocking the zone for the customer, database GEO MAP is designed to provide general protection for sensitive locations around the world - it is not tailored to any specific set of regulations.
In addition, some DJI GEO 2.0 zones do not prohibit flight - they only inform users of potential hazards.
Zones in DJI GEO 2.0

Zones in the GEO database are divided into the following areas:
Restricted Zones - in these zones, which are red in the DJI GO 4 app, flight is blocked; to fly in Restricted Zones you must obtain permission, which we will write more about later,Altitude zones - flying in these zones will give you a warning in the DJI GO 4, and your flight altitude will be limited,
Authorization zones - the most common DJI GEO 2.0 zone, SMS or bank card authorization is required - identity verification, no fees are charged;
Warning zones - zones that overlap with airspace CTR, MATZ TRA - airports, military facilities, so-called temporary reserved zones, etc. - flight is possible with the approval of the governing body,
Extended warning zones - you need to unlock the flight by authorization, as in the case of the Authorization Zone, but unlike flying in it, here we do not need to have a permanent Internet connection and a verified account during the flight (authorization is one-time).
How to unlock Authorization Zones (blue) in the DJI GO 4 app
After going to the flight site and launching the drone, a message will appear for us in the Authorization Zone, in the DJI GO 4 app:
There will also be a place to enter your phone number or credit card - to verify our identity. If you choose to verify via phone number, you will receive a code to enter in the following window.
After these steps, our chosen zone should already be in the list, all we have to do is import it to the drone by pressing Import to Aircraft.
How to unlock Restricted Zones (red) / No Fly Zones in the DJI GO 4 app
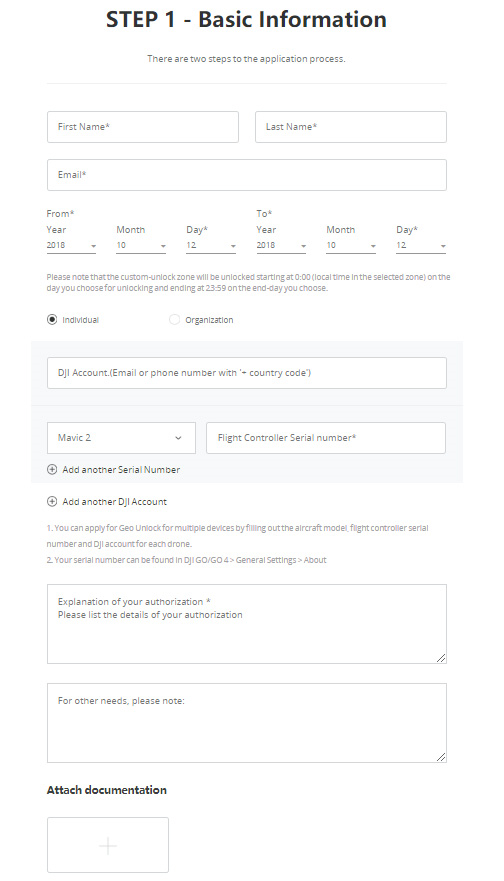
The red zone covers areas requiring increased control, so flying in it requires sending the appropriate form.To submit the form, go to the DJI website under the tab Fly Safe and click the UNLOCK A ZONE button.
We are shown a form:

In the form to remove the lock on the DJI GEO 2.0, we specify:
- First Name Last Name,
- E-mail Address,
- The date on which the blockade is to be removed,
- DJI account name (email address or phone number),
- Drone model and controller serial number,
- The industry we work in and the justification for removing the blockade,
- In addition, we can attach files with the permission or permission to fly obtained from the relevant authority, a scan of our qualification certificate.
Then, we go to the map and select the area we want to unlock, remembering to keep enough stock. Validate and enter the verification code, then wait for an email confirming the unlock, which you should receive within 24 hours max - usually it's a few minutes.
After receiving a message from DJI confirming that we can remove the lock, we launch the drone and device with the DJI GO 4 app and import the list with the unlocked zone by going into : General Settings -> Unlocking List -> App -> Import to Aircraft - these activities we can perform outside the place of flight, Internet connection is necessary.
The final step is to import the zone into the drone before the individual flight. We do it already on the flight site, after turning on the drone and the app.
Enter one by one: General Settings -> Unlocking List -> Aircraft and move the selected area.
We accept the terms and conditions confirming that we have the appropriate authorization to perform the flight. Here the Internet connection is not necessary, we just need a connection to enough satellites and we can start flying.
Article written based on information provided on https://www.dji.com/flysafe
Show more entries from
June 2019